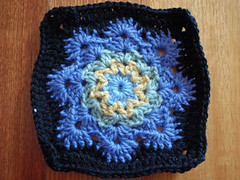
Later that night I set about trying to replicate the square while I had the original in front of me - I reckon I got it spot on, or at the least, very darn close!
I used a 4mm hook and approximately 8ply yarn (DK weight) which gave me a perfect 6 inch square. I reckon if you were to make it with a worsted weight/10ply yarn and a 5mm hook, it would give you an 8 inch square.
Please be advised, I am NOT claiming credit for this square, and I am NOT claiming to have designed it. Unfortunately I just don't know the origins of the square and/or if a pattern for the original exists somewhere out there.
Woolly's Snowflake Square - FREE Crochet Pattern
6 inch / 8 inch version
To make the 6 inch version, use a 4mm hook and 8ply (DK weight) yarn
To make the 8 inch version, use a 5mm hook and 10 ply (worsted weight) yarn
Stitches Used
Ch = chain
Sl-st = Slip Stitch
SC = Single Crochet
DC = Double Crochet
V-Stitch = DC, ch-1, DC (into same stitch or space)
Double-V-Stitch = 2DC, ch-2, 2DC (into same stitch or space)
Triple-V-Stich = 3DC, ch-3, 3DC (into same stitch or space)
Ch-6. Sl-st to first ch to form a ring.
Round 1: Ch-3. 15 DC into ring. Sl-st to top of beg ch-3. (16 DC made).
Round 2: Sl-st between any two DC of round 1. Ch-4, then DC in the same space (counts as first V-stitch). *Skip next 2DC and V-Stitch between DCs.* Repeat from * to * 6 times. Sl-st to 3rd ch of beg ch-4. (8 V-Stitches made).
Round 3: Sl-st to ch-1 space of any V-Stitch from round 2. (Ch-3, DC, ch-2, 2DC) into same Ch-1 space (first Double-V-Stitch made). *Double-V-Stitch in next ch-1 space.* Repeat from * to * 6 times. Sl-st to top of beg ch-3. (8 Double-V-Stitches made).
Round 4: Sl-st to ch-2 space of any Double-V-Stitch from round 3. (Ch-3, 2DC, ch-3, 3DC) into same ch-2 space (first Triple-V-Stitch made). *Triple-V-Stitch into next ch-2 space.* Repeat from * to * 6 times. Sl-st to top of beg ch-3. (8 Triple-V-Stitches made).
Round 5: Sl-st to ch-3 space of any Triple-V-Stitch from round 4. (Ch-3, 3DC, ch-2, 4DC) into the same ch-3 space (corner made). *8DC in next ch-3 space (side made). (4DC, ch-2, 4DC) in next ch-3 space.* Repeat from * to * 2 times. 8 DC in the last ch-3 space. Sl-st to top of beg ch-3. (4 corners & 4 sides made).
Round 6: Sl-st to any corner ch-2 space. (Note: with the exception of the corners, where you will be working into the chain spaces, all other stitches in this round are worked BETWEEN the stitches... this is what will give the previous round the spikey/snowflake-like appearance).
(Ch-3, DC, ch-2, 2DC) in the same corner space. *Now, do a SC between, the next 2 sts, HDC between the following two sts, and DC between the next two sts. DC between the group of 4 DC and 8 DC. Working between the stitches of the next 8 DC, you will do the following 7 stitches. DC, HDC, SC, SC, SC, HDC, DC. Now DC between the group of 8 and the next group of 4. Between the next 4 DC, you will DC, HDC, SC respectively. This takes you to the next corner ch-2 space. (2DC, ch-2, 2DC) in the corner space.* Repeat from * to * for each side. Sl-st to top of beg ch-3.
Round 7: Sl-st to any corner ch-2 space. (Ch-3, DC, ch-2, 2DC) in same space. DC in each st from previous row. In each corner ch-2 space (2DC, ch-2, 2DC). Continue around square. Sl-st to top of beg ch-3. Finish off.
10 OR 12 INCH VERSION - (Extended Remix Version)
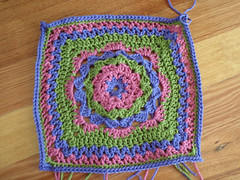
As much as I love the square, I have a blanket of 12 inch squares, so I decided to keep going and create what I like to call the "extended remix."
To make a 10 or 12 inch version of this square, complete all of the instructions for the 6 or 8 inch version then continue on with rounds 8 - 11. Using a 4mm hook and 8ply (DK weight) yearn should give you a 10 inch square. Using a 5mm hook and 10 ply (DK weight) yarn should give you a 12 inch square.
Round 8: Sl-st to any ch-2 corner space. (Ch-3, DC, ch-2, 2DC) in same corner space. *Skip the next two DC of round 7 and V-stich into the third DC. Skip one st. V-stitch - repeat. Skip the last two DC of the side and (2DC, ch-2, 2DC) into the corner ch-2 space.* Repeat from * to * for the remaining three sides. (You should end up with 10 V-stitches on each side - not counting the corner stitches).
Round 9: Repeat row 8.
Round 10: SC in every stich of row 9 and (2SC, ch-2, 2SC) in each corner.
Round 11: Repeat row 10
I hope all of the instructions make sense - I'm a bit under the weather as I post this, so they make sense TO ME... hopefully they'll make sense to you, too! :)

This is gorgeous! Thanks for sharing the pattern. Your squares look so striking--the black makes the colors really stand out.
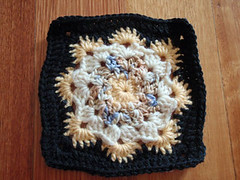
ReplyDeleteThank you La Manosa. It's a wonderful pattern. I'm really enjoying making it. Regarding the black, I've learned it helps to do my last row prior to the black in a bright or light colour. It really helps the snowflake pop!
ReplyDeleteLove it , thank you for sharing !
ReplyDeleteThis is seriously gorgeous, I found it on a random "motif" search on Ravelry and it stood out from the rest. Can't wait to try it :-) Stra
ReplyDeleteThank you for sharing! Nice idea for christmas decoration.
ReplyDeleteI have made over a hundred of these and am still loving the pattern. I must get around to putting up some pictures one of these days.
ReplyDeleteHi there! I am an editor of AllFreeCrochetAfghanPatterns and we are updating our system. I would love to feature your patterns on my site with full credit to you. I know my readers would just love it and in return would generate some nice traffic to your site. If you agree and would like us to feature your project, our readers will simply click the link to your blog to get your full tutorial.
DeleteThanks, and I look forward to hearing from you!
Nicola Trumbull, Editor
www.AllFreeCrochetAfghanPatterns.com
ntrumbull(AT)primecp(dot)com
Prime Publishing LLC
Hi there! love this little square and I was wondering if I could re-print it in our crochet group's newsletter? We do a block a month and I thought yours would be a beautiful addition! :)
ReplyDeleteThanks!
Great pattern! Thanks so much for sharing it! I linked to it this morning on my blog at http://www.mooglyblog.com/crochet-squares-for-afghans/ if you want to come check it out. :)
ReplyDeleteTrès joli modèle surtout le flocon de neige
ReplyDeleteamicalement
mamifoise
Loved making this square, it was so quick and easy, thanks for sharing it. TeddyE
ReplyDeleteThanks for the tip on using a bright color before using the black. It does make a huge difference! Also, you are super nice to share this pattern with others!
ReplyDeleteHowdy from Georgia!!!
ReplyDeleteI found this beautiful square*(I LOVE it on black bg!)on another site.
It is beautiful, and I just want to thank you for sharing this gift!!!
Stay safe!!
Poppy
Thank you for this pattern! I was just going through pictures I've saved for inspiration and came across it again. Now I'm going to buy some yarn to make it!!
ReplyDeleteHi, I'm new to crochet, and was wondering if this beautiful pattern is in US stitch or UK stitch please? I'm in Ireland... I've been messing around doing placemats and coasters and feel it's time for a mini-throw for my armchairs :) Thanks in advance, Paula
ReplyDeleteSorry for the VERY late reply. It uses US terminology.
DeleteI thought you ought to know that I saved your pattern in Pinterest. I get pinged every time someone saves my link and yours is the most popular thing I have ever saved! I haven't had the chance to work it up yet, but I get reinspired every time it gets passed along.
ReplyDeleteCool! I was wondering how it got on Pinterest! Ha ha. If you've had a chance to make it, I hope you liked it :)
DeleteI've searched but don't understand the difference between working between the stitches and working into the chain spaces. Aren't chain space between the chains?
ReplyDeleteApologies for the very late reply. Here is a link to a YouTube video that shows how to crochet between the stitches. https://youtu.be/4JGUHVkvZUw
DeleteDo you have instructions on how you joined the squares and rounds by color for the grey and white blanket?
ReplyDeleteI'm sorry, I"m not sure which grey and white blanket you are referring to?
Delete6 makes no sense. No matter how I add it up its not correct. I've triple checked my stitches.
ReplyDeleteJust double checking if you are going between the stitches?
DeleteAnd thank you for posting it in a way that I could link to the pattern without having to download a PDF program not on my computer. It's beautiful and I look forward to making something with it.
ReplyDeleteI hope you've enjoyed it - if you made it!
DeleteJust seeing and these are a challenge for me. I Love them and will do? Thank you, such a Talent you have.
ReplyDeleteHi, could you write a short description of how you joined your squares please? Or link to a video tutorial? Love the pattern and almost done my blanket! Thanks!
ReplyDeleteI would love to know how you joined your squares, exactly. It looks like a Granny-stitch border, but the instructions (or a link to) would be much appreciated.
ReplyDelete