Showing posts with label free crochet pattern. Show all posts

Tuesday, October 18, 2011

Bobble Hanger Cover - Free Crochet Pattern


Copyright © October 2011 by Letitia Sherriff

Materials Needed:
* Approximately 35 grams of Lily Sugar’n Cream Cotton (or substitute any worsted weight yarn)
* 4.00mm crochet hook (US size G)
* One adult-sized wooden craft hanger
* Yarn needle for finishing
* Scissors
* (Optional) Approximately 15 cms (6 inches) of plastic tubing


Abbreviations Used:
CH = chain
SC = single crochet
ST = stitch
WS = wrong side
RS = right side
(US crochet terminology used)

Special Stitches:
Bobble Stitch = yarn over and insert hook in stitch, yarn over and draw up a loop (3 loops on hook), yarn over and draw through two loops (two loops on hook). Yarn over and insert hook in same stitch, yarn over and draw up a loop (four loops on hook), yarn over and draw through two loops (three loops on hook). Yarn over and insert hook in same stitch again, yarn over and draw up a loop (5 loops on hook), yarn over and draw through two loops (4 loops on hook), yarn over and draw through all four loops, leaving one loop on hook.

Hanger Cover:
Ch-52
Row 1: SC in 2nd CH from hook and each CH to end (51 SC).
Row 2: CH-1, turn. (WS) *SC in first ST, bobble (see special stitches) in next ST*. Repeat from * to * 24 times ending with SC in last ST. (26 SC & 25 bobbles made).
Tip: try to pull your SC stitches tight so the bobbles will “pop” more.
Row 3: ch-1, turn. (RS) SC in each ST. (51 sc)
Row 4: (WS) repeat row 3.
Row 5: (RS) repeat row 3.
Row 6: (WS) repeat row 2.
Row 7: (RS) repeat row 3.
Row 8: (WS) repeat row 3.

Finishing: Leaving tail of approximately 60 centimetres (24 inches), break yarn and secure last stitch. With RS facing out, whipstitch last row and beginning chain together. Insert hanger and align so bobbles are on the sides of the hanger, and whip stitch ends closed as well. Put plastic tubing over hanger hook if desired. You’re done!

Please note: This pattern is for free PERSONAL USE ONLY. You may not sell items made from this pattern, or republish this pattern in any form without the express written permission from the author.

Saturday, August 28, 2010

Woolly's Snowflake Square - Free Crochet Patterns

On a recent crochet retreat, one of the members (1woollywombat) shared a beautiful crochet blanket she found at an op shop for only $3 or $4! It's a beautiful blanket and I really love the squares it used.

Later that night I set about trying to replicate the square while I had the original in front of me - I reckon I got it spot on, or at the least, very darn close!

I used a 4mm hook and approximately 8ply yarn (DK weight) which gave me a perfect 6 inch square. I reckon if you were to make it with a worsted weight/10ply yarn and a 5mm hook, it would give you an 8 inch square.

Please be advised, I am NOT claiming credit for this square, and I am NOT claiming to have designed it. Unfortunately I just don't know the origins of the square and/or if a pattern for the original exists somewhere out there.

Woolly's Snowflake Square - FREE Crochet Pattern
6 inch / 8 inch version

snowflake 006
snowflake 001

To make the 6 inch version, use a 4mm hook and 8ply (DK weight) yarn
To make the 8 inch version, use a 5mm hook and 10 ply (worsted weight) yarn

Stitches Used
Ch = chain
Sl-st = Slip Stitch
SC = Single Crochet
DC = Double Crochet
V-Stitch = DC, ch-1, DC (into same stitch or space)
Double-V-Stitch = 2DC, ch-2, 2DC (into same stitch or space)
Triple-V-Stich = 3DC, ch-3, 3DC (into same stitch or space)

Ch-6. Sl-st to first ch to form a ring.

Round 1: Ch-3. 15 DC into ring. Sl-st to top of beg ch-3. (16 DC made).

Round 2: Sl-st between any two DC of round 1. Ch-4, then DC in the same space (counts as first V-stitch). *Skip next 2DC and V-Stitch between DCs.* Repeat from * to * 6 times. Sl-st to 3rd ch of beg ch-4. (8 V-Stitches made).

Round 3: Sl-st to ch-1 space of any V-Stitch from round 2. (Ch-3, DC, ch-2, 2DC) into same Ch-1 space (first Double-V-Stitch made). *Double-V-Stitch in next ch-1 space.* Repeat from * to * 6 times. Sl-st to top of beg ch-3. (8 Double-V-Stitches made).

Round 4: Sl-st to ch-2 space of any Double-V-Stitch from round 3. (Ch-3, 2DC, ch-3, 3DC) into same ch-2 space (first Triple-V-Stitch made). *Triple-V-Stitch into next ch-2 space.* Repeat from * to * 6 times. Sl-st to top of beg ch-3. (8 Triple-V-Stitches made).

Round 5: Sl-st to ch-3 space of any Triple-V-Stitch from round 4. (Ch-3, 3DC, ch-2, 4DC) into the same ch-3 space (corner made). *8DC in next ch-3 space (side made). (4DC, ch-2, 4DC) in next ch-3 space.* Repeat from * to * 2 times. 8 DC in the last ch-3 space. Sl-st to top of beg ch-3. (4 corners & 4 sides made).

Round 6: Sl-st to any corner ch-2 space. (Note: with the exception of the corners, where you will be working into the chain spaces, all other stitches in this round are worked BETWEEN the stitches... this is what will give the previous round the spikey/snowflake-like appearance).

(Ch-3, DC, ch-2, 2DC) in the same corner space. *Now, do a SC between, the next 2 sts, HDC between the following two sts, and DC between the next two sts. DC between the group of 4 DC and 8 DC. Working between the stitches of the next 8 DC, you will do the following 7 stitches. DC, HDC, SC, SC, SC, HDC, DC. Now DC between the group of 8 and the next group of 4. Between the next 4 DC, you will DC, HDC, SC respectively. This takes you to the next corner ch-2 space. (2DC, ch-2, 2DC) in the corner space.* Repeat from * to * for each side. Sl-st to top of beg ch-3.

Round 7: Sl-st to any corner ch-2 space. (Ch-3, DC, ch-2, 2DC) in same space. DC in each st from previous row. In each corner ch-2 space (2DC, ch-2, 2DC). Continue around square. Sl-st to top of beg ch-3. Finish off.

10 OR 12 INCH VERSION - (Extended Remix Version)
12inchwoollysquare
As much as I love the square, I have a blanket of 12 inch squares, so I decided to keep going and create what I like to call the "extended remix."

To make a 10 or 12 inch version of this square, complete all of the instructions for the 6 or 8 inch version then continue on with rounds 8 - 11. Using a 4mm hook and 8ply (DK weight) yearn should give you a 10 inch square. Using a 5mm hook and 10 ply (DK weight) yarn should give you a 12 inch square.

Round 8: Sl-st to any ch-2 corner space. (Ch-3, DC, ch-2, 2DC) in same corner space. *Skip the next two DC of round 7 and V-stich into the third DC. Skip one st. V-stitch - repeat. Skip the last two DC of the side and (2DC, ch-2, 2DC) into the corner ch-2 space.* Repeat from * to * for the remaining three sides. (You should end up with 10 V-stitches on each side - not counting the corner stitches).

Round 9: Repeat row 8.

Round 10: SC in every stich of row 9 and (2SC, ch-2, 2SC) in each corner.

Round 11: Repeat row 10

I hope all of the instructions make sense - I'm a bit under the weather as I post this, so they make sense TO ME... hopefully they'll make sense to you, too! :)

Friday, January 15, 2010

Odyssey 12 inch Square - Free Crochet Pattern

Copyright 2010 by Letitia Sherriff
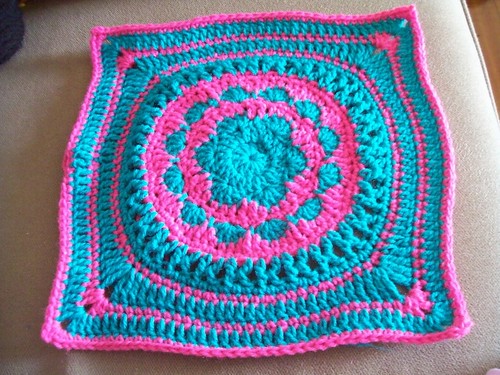

Materials Used

  • Carnival 8ply Acrylic in Turquoise (Colour A)
  • Spotlight Marvel 8ply Acrylic in Hot Pink (Colour B)
  • 4mm crochet hook

Pattern written using US crochet terminology

Stitch Guide

Treble Cross (Trx) = Yo twice, insert hook in next st, yo and pull up a lp (4 lps on hook), yo, draw through 2 lps (3 lps on hook), sk next st, yo, insert hook in next st, yo and pull up a lp (5 lps on hook), [yo, draw through 2 lps] 4 times (1 lp on hook), ch-1, yo, insert hook halfway down st just made in space where lower legs join, yo and pull up a lp, [yo, draw through 2 lps] twice.
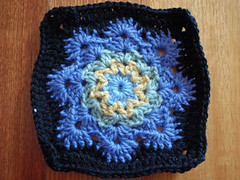
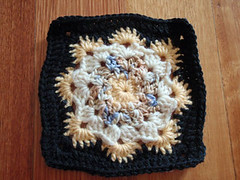

Odyssey 12 inch Square
Ch-4, join with a sl-st to first chain to form ring.

Round 1: With Colour A... ch-3 (counts as first dc), 11 dc into ring. Join with sl-st to beg ch-3. (12 dc)

Round 2: Ch-3, dc into first st, 2 dc into each remaining st. Join with sl-st to beg ch-3. (24 dc)

Round 3: Skip first st of round 2, *5 dc into next st (shell made), skip on st, sl-st in next st, skip st,* repeat from * to * 5 times, sl-st to beg of round (6 shells). Finish off Colour A.

Round 4: Attach Colour B in the middle (3rd) stitch of any shell. Ch-1, *sc in same st, hdc, dc, tc, dc, hdc.* Repeat from * to * 5 times. Sl-st to first sc. (36 sts)

Round 5: Ch-1, *sc in first sc, sc in second st, 2 sc in the next stitch*. Repeat from * to * all the way around. Join with a sl-st to first sc. (48 sc). Finish off Colour B.

Round 6: Attach Colour A with a sl-st in first sc of round 5. Skip first sc of round 5, *5 dc into next st (shell made), skip one st, sl-st in next st, skip st.* Repeat from * to * 11 times, sl-st to beg of round (12 shells). Finish off Colour A.

Round 7: Attach Colour B in the middle (3rd) stitch of any shell. Ch-1, *sc in the same st, hdc, dc, tc, dc, hdc*. Repeat from * to * 11 times. Sl-st to first sc. (72 sts)

Round 8: Ch-1, *one sc in each of the first 4 sts, 2 sc in the next st.* Repeat from * to * all the way around (13 times). Finish off the round with one sc in each of the last two sts. Join with sl-st to first sc. (86 sc). Finish off Colour B.

Round 9: Join Colour A in any sc of round 8. Ch-4, Trx in next st (see special stitches). Repeat with Trx's around. In second to last stitch... yo twice, insert hook in second to last st, you and pull up a lp (4 lps on hook), yo, draw through 2 lps (3 lps on hook), yo, insert hook in 2nd chain of beg ch-4, yo and pull up loop (5 lps on hook), [yo draw through 2 lps] 4 times (1 lp on hook), ch-1, sl-st to 4th chain of beg ch-4. (29 Trx).

Round 10: Ch-1, sc once in each st. Join with sl-st to first sc. (86 sc). (Hint: each Trx of previous round receives three sc - one in the top of the right leg, one in the middle of the two legs, and one in the top of the left leg). Finish off Colour A.

Round 11: Attach Colour B in any sc of round 10. Ch-1, *sc in each of the first four sts, 2 sc in next st.* Repeat from * to * all the way around. Finish off the round with one additional sc, then join with a sl-st to first sc. (103 sc). Finish off Colour B.

Round 12: Join Colour A in a sc that is in line with the centre of one of the six shells from round 3 (this will ensure that your centre motif is straight inside your finished square). Ch-3, one dc in each of the next 12 sts, *tc, tc, (2tc, ch-2, 2tc) in the next st, tc, tc, one dc in each of the next 21 sts*. Repeat from * to * 3 times (ending with 9 dc in the last repeat). Sl-st to top of beg ch-3. Finish off colour A.

Round 13: Join Colour B in any dc of round 12. Ch-1, one sc in each st all the way around, and (2 dc, ch-2, 2 dc] in each corner ch-2 space. Join with sl-st to beg sc. Finish off Colour B. (Special note: no, that is not a typo. This round is all sc, except the corners which are dc).

Round 14: Join Colour A in any sc of round 13. Ch-3, dc in each st, and [2 dc, ch-2, 2 dc] in each corner ch-2 space. Join with sl-st to top of beg ch-3. Finish off Colour A.

Round 15: Join Colour B in any dc of round 14. Ch-1, sc in each st, and [2 dc, ch-2, 2 dc] in each corner ch-2 space. Join with sl-st to beg sc. Finish off Colour B.

Weave in all ends and you're done!

*(21 January 2010). Special thanks to HappyPeacock and Margate of Ravelry for pointing out a few typos on my original!