
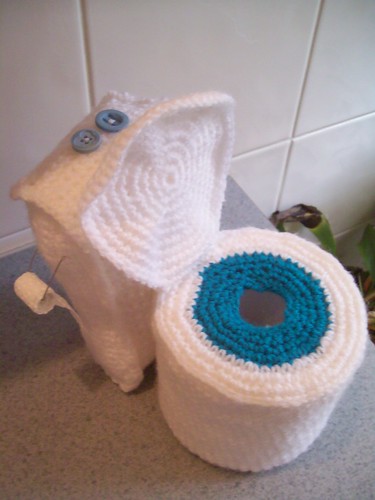
I added two different sized buttons to the top of the tank to represent the half flush and full flush buttons we have here in Australia. I then manipulated a small paper clip and some paper towel into a toilet roll and attached it to the side of the tank. (I have to say, the little roll of toilet paper is probably my favourite part!)
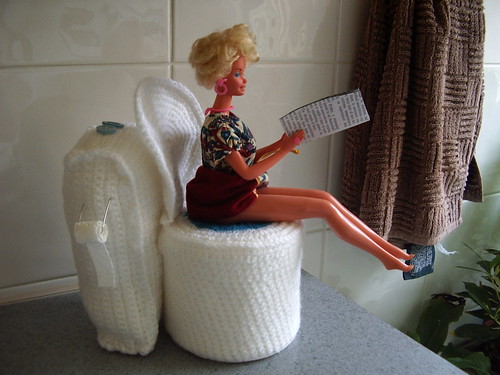
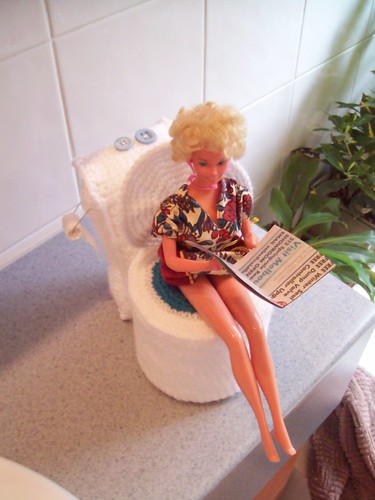
Then it came time to making the person to go down the hole. I got some flesh coloured yarn and started with the legs. Ugh! It looked awful and it definitely didn't look anything like a leg. I grabbed one of my old childhood Barbie dolls to get some perspective and to use as a model for my crocheted person. Well dang - this toilet was the perfect size for Barbie. She looks pretty darn funny sitting there atop the toilet.
That's it! I'll use Barbie. Oh I loved this idea 100 times more than making a crochet person for the toilet. It was like Barbie thumbing her nose at all those people who have made her stand inside a roll of toilet paper in some horrible garrish enormously puffy dress with some equally awful hat on her head. Love it!
Of my Barbies, my Miss Amercia 1970s Quick Curl Barbie won the honours. I changed her into a short dress that one of my other Barbies had been wearing (to hike up around her waist so she could use the toilet). She also had the advantage of having bent arms.... perfect for holding the newspaper! I also love the fact that she looks so much like a TV character Kath, from a show here called "Kath and Kim." The exact same frizzy hair and all.
My one regret is that I didn't not have a tiny pair of Barbie panties to put around Barbie's ankles, but I was still super happy with the result. I know it made me laugh, and I hoped it would give others a good laugh, too. Well, it must of worked because I won the competition! Yippee!
I wrote down the pattern whilst making Barbie's toilet. I will endeavour to get it up here on my blog sometime in the next week or so. So stay tuned!
HERE'S THE PATTERN
Barbie’s Toilet, Toilet Paper Roll Cover Pattern
Copyright August 2009 by Letitia Sherriff
Materials used:
3mm hook
*Carnival 8ply Acrylic White (approx 50 grams)
*Carnival 8ply Acrylic Turquoise (approx 10 grams or less)
*Any DK weight yarn (or 8ply) may be substituted for these yarns
Approximately two handfuls of hobby fiber-fill
Two different sized buttons (or one oblong shaped button)
One small paperclip
A small scrap of toilet paper or paper towel
Two small pieces of clear sticky tape
Two stitch markers
Yarn needle to darn in the ends
Barbie (optional)
Old sheet of newspaper (optional)
Roll of toilet paper to sit inside
TOILET BASE
With turquoise blue colour (this forms the “water” for the inside of the toilet)
Ch-22, slip stitch to first chain to form a ring.
Round 1: ch-1. SC once into each chain around (slip stitch into the first SC to finish the round, for this and every subsequent round). (22 SC made).
Round 2: ch-1. *Two SC into the first stitch. 1 SC into the next stitch.* Repeat from * to * around. (33 SC made).
Round 3: ch-1. *Two SC into the first stitch. 1 SC into each of the next 2 stitches.* Repeat from * to * around. (44 SC made). Finish off blue.
You are now going to be working the “toilet seat”.
Round 4: Attach white yarn in first SC of Round 3. *Ch-1, 2 SC in the first stitch. 1 SC into each of the next 3 stitches.* Repeat from * to * around.
Round 5: Ch-1. *2 SC into first stitch. 1 SC into each of next 5 stitches.* Repeat from * to * around.
Round 6: Repeat Round 5. (You should now check that the circle you’ve made is the same size as the top of the roll of toilet paper you are going to use to put inside the cover. Roll sizes vary greatly from brand to brand. If necessary, you can repeat round 6 to make it larger… or rip out a row if it is too big).
Round 7: TURN WORK OVER TO THE “WRONG SIDE.” You are now going to surface crochet (around the post) on the bottom of side of Round 6. 1 SC around each stitch of Round 6.
You are now going to be woking the base of the toilet, under the toilet seat.
Round 8. Ch-1. 1 SC into each stitch.
Round 9. Ch-1. *1 SC into each of the next 4 stitches. You are now going to do a SC decrease over the next two stitches (aka SC2TOG).* Repeat from * to * around.
Round 10: Ch-1. 1 SC into each stitch.
Round 11: Repeat Round 10.
Round 12: Repeat Round 9.
Rounds 13-22: Ch-1. 1 SC into each stitch.
At the end of round 22, you should make sure to check that your item now adequately covers your roll of toilet paper. If it is not long enough, you can add additional row(s) of SC. Fasten off.
LID
With white… Ch-4. Slip stitch into first chain to form a ring.
Round 1: Ch-1. 10 SC into the center of the ring. Slip stitch to first SC to join round (here and at the end of every subsequent round). (10 SC made).
Round 2: Ch-1. 2 SC into each stitch around. (20 SC made).
Round 3: Ch-1. *2 SC into first stitch. 1 SC into next stitch.* Repeat from * to * around. (30 SC made).
Round 4: Ch-1. *2 SC into first stitch. 1 SC into each of the next 2 stitches.* Repeat from * to * around. (40 SC made).
Round 5: Ch-1. *2 SC into first stitch. 1 SC into each of the next 3 stitches.* Repeat from * to * around. (50 SC made).
Round 6: Ch-1. *2 SC into first stitch. 1 SC into each of the next 4 stitches.* Repeat from * to * around. (60 SC made).
Attached lid to base of toilet by single crocheting the two together over approximately 8 stitches. Attach the lid at the raised round that forms the outside edge of the toilet seat above.
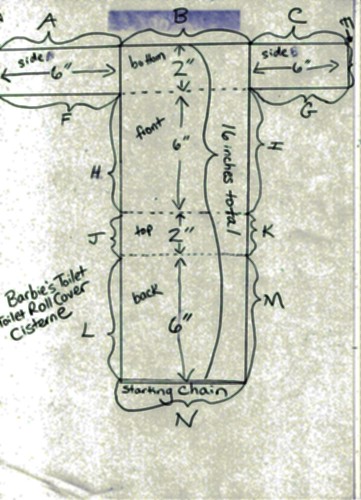
CISTERN / TANK
With white… Ch-17.
Row 1: SC into the 2nd chain from the hook and into each chain across (16 SC made). Ch-1 and turn.
Rows 2-77: SC into each stitch across. Ch-1 and turn. (work should measure 16 inches long. If work is not 16 inches long, you should add additional rows of SC as necessary or rip out rows if too long).
Measure six inches down on each side of the work and place a stitch marker on each side.
Turn your work ¼ turn clockwise. You will now be working one of the sides of the cistern (as indicated by the A & F in the diagram).
Row 1 (Side A/F): Ch-1. Place 10 SC evenly spaced over these 6 inches (as indicated by your stitch marker). Ch-1 and turn.
Row 2 (Side A/F): SC in each stitch across. Ch-1 and turn.
Rows 3-10 (Side A/F): Single crochet in each stitch across… until the side measures 6 inches.
Rotate work ¼ turn clockwise. Work 10 SC over the side of the cistern side you just made (indicated by A in the diagram). Continue with an additional 10 SC over the top of your work (indicated by B in the diagram). Turn work ¼ turn counterclockwise then flip.
You will now repeat the instructions that you did for Side A/F, but now for Side C/G.
Turn work ¼ clockwise and work 10 SC over the side (indicated by C in the diagram). Slip stitch to last adjoining stitch of area B and finish off.
IMPORTANT: At this point please remove about 2 feet of white yarn from your ball or skein and set aside.
Making Up (all will be done with SC).
With white… Join yarn at the corner where G & H meet.
You are now going to join sides G & H together.
Continue by joining areas E & K together.
Continue by joining C & M together.
Continue by joining B & N together.
Continue by joining A & L together.
Continue by joining D & J together.
BEFORE YOU DO THE FINAL JOIN OF F & H…..
Now is a good time to sew on any “flusher buttons” or items that you intend to attach to the cistern while you still have access to both the interior and exterior of your work.
You will also need to attach the cistern to the base of the toilet at this point. Make sure you line it up properly with where the toilet lid is attached to the base. Using the two feet of white yarn you set aside earlier, threaded through a yarn needle, just whip stitch the two together, attaching the front of the cistern to the back of the toilet in a few spots.
Now take your hobby/fiber fill and stuff it into the cistern. I recommend stuffing it pretty full so that the cistern is nice and firm and will stand up well. If you run out of hobby fill you can even use some paper towel, toilet paper, etc to fill it up. I DO recommend using something white to stuff it so no colour shows through your white yarn.
You are now ready to finish up the cistern by joining sides F & H with SC. Finish off and weave in your ends. Ta-da!
You can now add your toilet paper roll to the side by manipulating a small paper clip and using some toilet paper or paper towel. (You may need a small piece of clear sticky tape to start the roll and to finish the roll). Don’t forget to leave some of the roll dangling!
Now you just need to find a Barbie to put on the top and you’re done!

This is wonderful. And you're right - the Barbie absolutely makes it. I smell Christmas gifts! Can't wait to see the pattern.
ReplyDeleteI LOVE this!! I've been looking for patterns for 2 totally unrelated things - barbie clothes (for my daughter) and a toilet roll cover. I was originally going to make Barbie some dresses, and a toilet roll cover that looks like... a toilet roll. LOL But now I SO want to make this!!!!!! I really hope you post a pattern. Love it, love it, love it!!
ReplyDeleteOK, this is ab fab! I would learn how to crochet just so I could make one of these. Nicely done!
ReplyDeleteThis is so funny, and really genius! LOVE!!!!
ReplyDeleteWhat a creative piece this is (and I normally abhor tp covers). I'm so glad you won the contest in Ravelry. It's too bad I can't find you in Ravelry under AuntieEllie because I'd love to see what else you've done.
ReplyDeleteLeslieEileen on Ravelry herself :)
Oh, what a great idea. Very funny.
ReplyDeleteI've a some old Barbie Dolls from my daughter on the attic.......
Thanks for all your wonderful comments. The pattern is up and I hope you will find it easy to understand.
ReplyDeleteLeslie - Yes, I'm on Ravelry as AuntieElle (no "I" in the "Elle" part.) Cheers!
This is absolutely smashing! How cute and clever.
ReplyDeleteDid you win the contest? I think you should have hands (or lids) down! Thanks for sharing.
such a neat pattern. i can't wait for my daughter to be into barbies.
ReplyDeleteBy the way, the asian writing posted August 27 is a porn site. I clicked thinking it would translate what it said. Won't do that again.
really genius and so funny , thanks for sharing
ReplyDeleteFantastic idea... I am not sure I'll make it but it was fun to see what people can do with the hook...
ReplyDeleteThis is hilarious. I may have to make some for my siblings for next Giftmas. Thanks for coming up with it, and thanks for posting!
ReplyDeleteFunny:)
ReplyDeleteI was web-searching for a tp cover and came across your pattern, so clever and cute. I was looking for something with a Christmas theme, but I'm going to have to try making one of yours! I even have a Barbie!
ReplyDeleteyou're so clever I LOVE it LOL
ReplyDeletewow. This is gorgeous.
ReplyDeleteI just wish I could crochet.
This is so unusual and cute, I wanted something different and found it,I even have lots of barbie dolls so I'm having fun doing this project.
ReplyDeleteThanks everyone. This toilet roll cover is still in my loo. Seeing Barbie is one from my childhood, she no longer sits on her throne. I've been looking for an inexpensive replacement for her though.
ReplyDeleteAuntieElle, Most Dollar Stores have very inexpensive versions of a Barbie doll...... also Walmart has a base version of an actual Barbie doll for around $7.00...... It would definetly be worth it - I'm going to try to make one - I love your pattern..
DeleteMaterials
DeleteSize 10 crochet cotton thread
No. 6 steel hook or size needed to obtain gauge
Gauge
10 sc = 1", 12 sc rows = 1"
Note 1: Once you make the tube, try it out on your doll. It should rest snugly on the hips or wherever you want it to start. Adjust the number of chains in the beginning if it does not fit properly.
Note 2: When you reach the end of the pattern, check the fit again to make sure it covers the parts you want sufficiently before sewing the ends in.
Note 3: If you do decide the change the number of chains, once you reach the Crotch area, make sure that the number of skipped stitches for each leg is equal so that it is symmetrical.
This is the back of the panties.
This is the back of the panties.
Pattern
Note 4: Sc2tog = sc next 2 sts together
Waistband
Rnd 1: Ch 38, sl st in the first ch to form ring, ch 1, sc in each st of the ch, join with sl st in first sc, turn. (38 sc)
Rnd 2: Ch 1, sc in each sc around, join, turn. Fasten off. (38 sc)
Note 5: At this point, the waistband is only 2 rows thick. If you want to increase the thickness of the band, feel free to add another round of sc's. The panties that I have encountered (those with snaps) ranged from having 1 to 3 rows of sc's for the waistband.
Crotch Area
Row 1: Sk 14 sts, join with sc in next st, sc in the next 9 sts, turn (10 sc) (Front of Panties)
Row 2: Ch 1, sc in each st, turn (10 sc)
Row 3: Ch 1, sc in 1st st, sc2tog, sc in next 4 sts, sc2tog, sc in last st, turn (8 sc)
Row 4: Ch 1, sc in each st, turn (8 sc)
Row 5: Ch 1, sc in 1st st, sc2tog, sc in next 2 sts, sc2tog, sc in last st, turn (6 sc)
Rows 6-8: Ch 1, sc in each st, turn (6 sc)
Row 9: Ch 1, sc in 1st st, (sc2tog) 2 times, sc in last st, turn (4 sc)
Rows 10-12: Ch 1, sc in each st, turn (4 sc)
Row 13: Ch 1, sc in 1st st, (2 sc in next st) 2 times, sc in last st, turn (6 sc)
Row 14: Ch 1, sc in each st, turn (6 sc)
Row 15: Ch 1, sc in 1st st, 2 sc in next st, sc in next 2 sts, 2 sc in next st, sc in last st, turn (8 sc)
Row 16: Ch 1, sc in each st, turn (8 sc)
Row 17: Ch 1, sc in 1st st, 2 sc in next st, sc in next 4 sts, 2 sc in next st, sc in last st, turn (10 sc)
Row 18: Ch 1, sc in each st, turn (10 sc)
Row 19: Ch 1, sc in 1st st, 2 sc in next st, sc in next 6 sts, 2 sc in next st, sc in last st, turn (12 sc)
Row 20: Ch 1, sc in each st, turn (12 sc)
Row 21: Ch 1, sc in 1st st, 2 sc in next st, sc in next 8 sts, 2 sc in next st, sc in last st, turn (14 sc)
Row 22: Ch 1, sc in each st. Fasten off, leaving a long tail. (14 sc) (Back of Panties)
Using the long tail, sew the end of panties to the opposite end of Rnd 2. In order to make sure both sides match, sk 7 sts from the front of panties and start sewing from there. There should be 7 sts on the other side to make the panties symmetrical.
Weave in all the ends.
Thank you, Diana!
Deletethank you
ReplyDelete:)
ReplyDeleteHello Auntie Ella,
ReplyDeleteMy name is Claire and I am an Assistant Producer for a BBC television programme called Room 101 - we are very keen to use a picture of your Barbie Doll loo roll cover. We think it is great! We are filming on Tuesday 8th October and I wondered if you could please contact me on contact@hattrick.com to discuss this further.
I'll look forward to hearing from you.
Best wishes,
Claire
Claire, I may be too late, but I have sent you an email. Cheers, L
DeleteThis is hilarious. I work for a health charity for an illness where people have to spend a lot of time in the toilet - they love this.
ReplyDeleteSuch a cute and interesting design. I love it! Thanks very much for sharing. :). :)
ReplyDelete____
Lee Ann. Http://crochetgottaloveit.blogspot.com
So cute...love it.....
ReplyDeleteThis is a smart blog. I mean it. You have so much knowledge about this issue, and so much passion. You also know how to make people rally behind it, obviously from the responses. portable toilet hire
ReplyDelete