I've been wanting to try dyeing wool for quite some time, but it just seemed so messy! I was also very worried about ruining my pots and pans. Then I saw a blog by Laughing Purple Goldfish Designs where she dyed some wool in the microwave - yes, the microwave!
Well I had no idea this was even possible! I was so excited, I had to give it a try. In addition to reading several of Laughing Purple Goldfish's related blogs, I also searched the internet for any other tips and tricks that might come in handy.
I started with three balls of Spotlight's Basic Harvest Wool (please be advised that if you are using food dye, you want to use 100% animal fibre).

Using the back of my office chair, I wound them into hanks and tied them together with some alpaca I was not particularly found of (a little test to see how the alpaca would take to the dyeing).

As I've read, I then soaked these hanks in the laundry sink full of tepid water with about 1 cup of vinegar. I've read you should soak them for at least half an hour, so I did it for one hour. (By the way, make sure your water is not too cold or too hot or run the risk of inadvertently felting your wool).

While my wool was soaking in the vinegar and water mix, I got the rest of my items ready to go. Food colouring, cups, some old takeaway food chopsticks for mixing, cling wrap, and some more vinegar.

Then I set about mixing my food dye colours with water and vinegar and trying to get some cool colours. (Long story short, these were not the colours I was aiming for at all, but they are pretty fun nonetheless).
I've read that a turkey baster is recommended for squirting the colours on, but I don't have one. Ironically I needed a "potty break" and came across this little dropper thingy in the bathroom that came with a perfume atomizer - that'll work!

So I drained the hanks, gave them a little bit of a "hug" in a towel and then laid them out on a couple of sheets of cling wrap (with some old towels underneath just in case).
So I drained the hanks, gave them a little bit of a "hug" in a towel and then laid them out on a couple of sheets of cling wrap (with some old towels underneath just in case).

Now it was time to put the colours on!!! Weeee!!!! Okay the perfume atomizer thingy was a little small, but beggars can't be choosers. (I reckon I will invest in a turkey baster though for future dyeing).
 Then I rolled it up in the clingwrap and popped it into a microwave safe dish.
 Cook for two minutes, rest for two minutes, cook for two minutes, rest for two minutes, cook for another two minutes. Obviously since I've just been cooking this thing for a total of six minutes, this puppy was hot. I carefully took it over to the laundry sink with my oven mitts and popped it into the sink. I then very carefully unwrapped it, being sure to avoid any steam burns.
 I wish you could see the steam coming off of this thing in the photo!
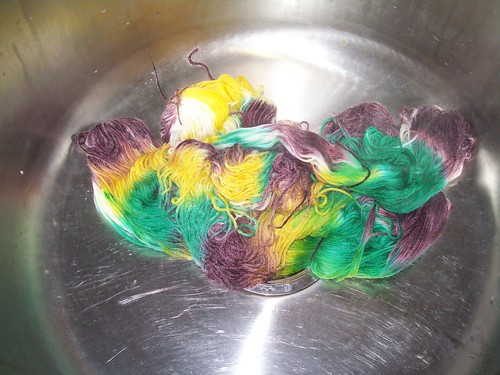 Then it was time to give it rinse with some tepid to warmish water (you don't want to hot or too cold so you don't accidentally felt it). Then another big hug in the towel to get some of the excess water out - and TA-DA! It's ready to go outside and dry!!!
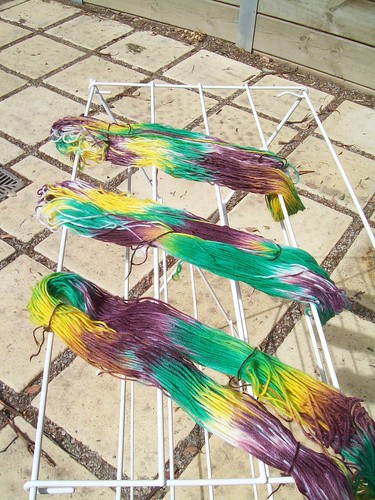 I can't wait until these are dry so I can put them into balls and then start crocheting with them!
 This was just so easy, so fast, and pretty mess-free. Because it's just food colouring, the glasses and bowl were just popped into the dishwasher and the chopsticks and cling wrap were popped into the garbage can. Clean-up complete! Too easy!
Obviously adult supervision is needed for this - especially with the microwaving and post-microwave unwrapping, but I think it would be so much fun for kids to be able to mix their own colours and squirt them onto the wool themselves. And it's totally safe since it's just food colouring. How excited would they be to have something made for them with wool they dyed themselves? :)))

Wow AuntieElle, that is the best description of dyeing I have ever seen.
ReplyDeleteYou really have made me want to try it.
Wonderful post AuntieElle and very good info on each step. Maybe I will have a go at it one day.
ReplyDeleteOh the visual tutorial is great! Makes me want to do it. Thanks for sharing Elle'
ReplyDeleteWHOA!!!! i want to do it now, or get you to make me a surprise colour batch and pay you back in bennie goodnes!!!!
ReplyDeletelizi (yes, i AM the aussie hooker! add me to watch me!!)
They look fabulous! BTW sauce bottles (y'know the picnic type ones?) work well for squirting dyes on! Have you tried Jelly? that is fun:D
ReplyDelete